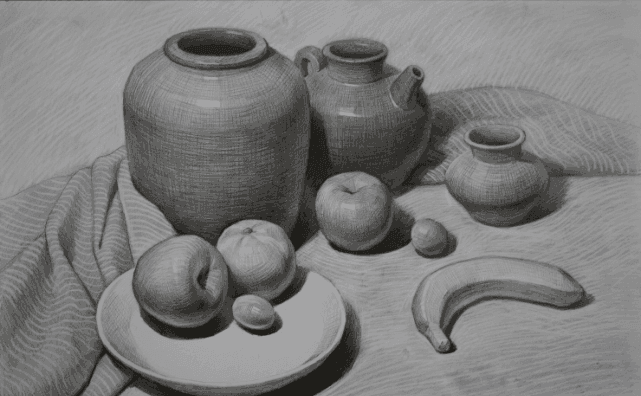
A Beginner’s Guide to Pencil Sketching: Mastering the Basics with Essential Tips
Pencil sketching is one of the most accessible and rewarding forms of art. Whether you're a complete beginner or someone looking to sharpen your drawing skills, pencil sketching allows you to express your creativity with just a simple tool—a pencil. The beauty of pencil sketching lies in its versatility, offering everything from light and delicate lines to bold, deep strokes. With the right techniques and a little practice, anyone can develop a strong foundation in this timeless art form.
In this guide, we’ll cover the essential tips and techniques you need to know to get started with pencil sketching. From choosing the right pencils to mastering shading, we’ll walk you through every step to help you create your first sketch with confidence.
1. Choosing the Right Pencils
The first step to successful sketching is selecting the right pencils. Pencils come in different grades, each offering a unique effect based on the hardness or softness of the graphite.
- H pencils (e.g., 2H, 4H, 6H) have harder graphite, resulting in lighter lines. These are great for fine details, light shading, or rough sketching where precision is needed.
- B pencils (e.g., 2B, 4B, 6B) have softer graphite and produce darker lines. These are ideal for bolder strokes, shading, and creating depth in your sketches.
- HB pencils are in the middle of the scale, providing a balanced line that’s neither too hard nor too soft, making them great for beginners.
Start your sketching journey with a small range of pencils—an HB, 2B, and 4B—to get a feel for how different grades affect your drawing. As you progress, you can expand your collection based on your preferences.
2. Holding the Pencil Correctly
How you hold your pencil can have a significant impact on the quality of your sketches. There are different grips for different purposes:
- Tripod grip: This is the traditional writing grip, where you hold the pencil between your thumb, index, and middle fingers. This grip provides control for fine details and precision work.
- Overhand grip: Hold the pencil loosely between your thumb and fingers, keeping the side of the pencil in contact with the paper. This allows for broader, lighter strokes and is great for sketching larger shapes and shading.
Experiment with different grips to see what feels comfortable for various tasks, such as outlining, detailing, and shading.
3. Understanding Line Variation
Line variation is a crucial aspect of pencil sketching. Mastering how to vary the thickness and darkness of your lines will give your drawings more depth and interest. Here’s how to practice line variation:
- Light pressure: For subtle, delicate lines, apply light pressure. This is useful for initial sketches and detailing.
- Heavy pressure: To create bolder, more defined lines, apply more pressure. Be careful not to press too hard, as this can damage the paper.
- Changing pencil angle: By adjusting the angle at which you hold the pencil, you can create different line thicknesses. Holding the pencil at a steep angle will give you thin, sharp lines, while a more horizontal grip will create wider, softer lines.
Practice drawing lines with varying pressure and angles to get comfortable with creating contrast in your sketches.
4. Basic Shapes and Outlines
Every complex drawing starts with basic shapes. Whether you’re sketching a portrait, a landscape, or an object, breaking down your subject into simple forms will make the process less intimidating. Here’s how to start:
- Start with simple shapes: Look at your subject and break it down into basic shapes such as circles, rectangles, triangles, or ovals. For example, if you’re drawing a face, the head could be an oval, and the eyes might be circular or almond-shaped.
- Refine the shapes: Once you have the basic shapes in place, start refining the outline. Add details gradually, keeping the initial sketch light so that adjustments can be made easily.
This step is crucial for beginners because it helps you maintain proportions and ensure that your drawing has a solid foundation before adding details.
5. Mastering Shading Techniques
Shading is what brings life and realism to your sketches. It helps define the form of an object and creates the illusion of light and shadow. Here are some key shading techniques to practice:
- Hatching: This involves drawing closely spaced parallel lines to create shading. The closer the lines, the darker the area will appear.
- Cross-hatching: This is a more advanced form of hatching where you layer another set of lines in the opposite direction to create deeper shadows.
- Stippling: Stippling involves creating shading by applying small dots. This technique takes time but can be very effective for textured surfaces.
- Blending: Blending is done by softly smudging the graphite with a blending stump or even your finger. This smooths out the pencil strokes and creates a more natural-looking gradient. Just be careful not to smudge too much, as it can make the drawing look muddy.
Practice each technique on a separate sheet of paper before applying it to your sketches. By mastering shading, you can create depth and realism in your work.
6. Proportions and Perspective
One of the biggest challenges for beginners is getting proportions and perspective right. These two elements are essential for making your sketches look realistic.
- Proportions: Proportion refers to the relationship in size between different elements of your drawing. For example, when drawing a person, the size of the head compared to the body should be accurate. To maintain proportions, you can use guidelines or reference photos to measure distances between different parts of your subject.
- Perspective: Perspective is all about drawing objects in a way that shows their placement in space. A good way to practice is by sketching objects with a vanishing point—a point on the horizon line where parallel lines seem to converge. This will help give your drawing depth and a 3D appearance.
Don’t be discouraged if proportions and perspective are challenging at first. These skills take time to develop, so keep practicing!
7. Using Erasers Creatively
Erasers aren’t just for fixing mistakes—they can also be used to create highlights and add texture to your sketches. Here’s how to use an eraser effectively in your sketching process:
- Highlighting: After shading, use a kneaded eraser to lift graphite from the page and create highlights. This is especially useful for adding light reflections or giving volume to certain areas.
- Creating texture: Erasers can also be used to create texture, such as the roughness of tree bark or the softness of hair. Lightly dab the eraser to remove small amounts of graphite for a textured effect.
Always keep a kneaded eraser or a soft eraser on hand for subtle adjustments and creative techniques.
8. Practicing Patience and Persistence
One of the most important tips for beginner sketch artists is to be patient. Sketching is a skill that improves with practice, and it’s normal to face challenges along the way. Here are a few tips to stay motivated:
- Start simple: Don’t overwhelm yourself by trying to sketch intricate subjects right away. Start with simple objects or scenes and gradually move on to more complex drawings.
- Draw every day: Consistency is key. Even if you only have 10 minutes, try to sketch something every day. Over time, you’ll see improvements in your technique and confidence.
- Don’t fear mistakes: Every artist makes mistakes—embrace them as part of the learning process. Sometimes, what seems like a mistake can turn into a creative opportunity!
Pencil sketching is a wonderful art form that offers endless possibilities for creativity and self-expression. With the right tools, techniques, and a bit of patience, anyone can learn to create beautiful sketches. By following the tips and techniques in this guide, you’ll be well on your way to developing your own unique sketching style. So grab your pencils, start practicing, and enjoy the journey of becoming a skilled pencil sketch artist!
Continue reading
View all-

The Twin Temptation: Bakers Frappe Powder for Your Cafe-at-Home Moments
Are you tired of spending a fortune at coffee shops to get that perfect frappe? What if you could recreate that creamy, smooth, and delicious experience right in your own...
The Twin Temptation: Bakers Frappe Powder for Your Cafe-at-Home Moments
Are you tired of spending a fortune at coffee shops to get that perfect frappe? What if you could recreate that creamy, smooth, and delicious experience right in your own...
-

Spice Up Your Plate: The Golden Touch of Puress Cold Pressed Mustard Oil!
Puress Cold Pressed Mustard Oil can transform a dish with its unique flavor profile. Try it now!
Spice Up Your Plate: The Golden Touch of Puress Cold Pressed Mustard Oil!
Puress Cold Pressed Mustard Oil can transform a dish with its unique flavor profile. Try it now!
-


